Fine Boring Bars with Micro Bore Units
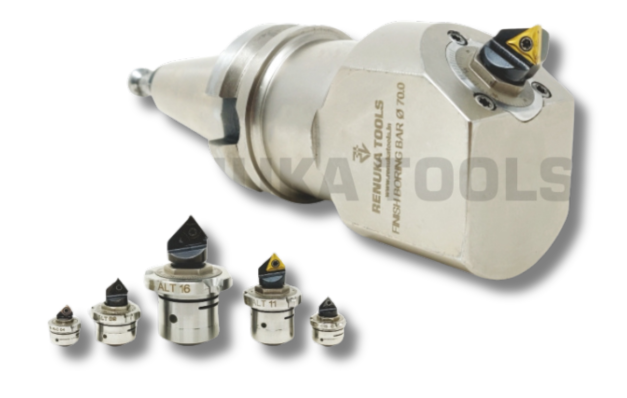
- Precision Finish Boring Bar with high accuracy & repeatability.
- Used for machining close tolerances.
- Facilitates precision adjustment with least count of 1 micron (0.001mm) radially.
- Used for finish boring application with a range of diameters from 20mm to 168mm.
- Tailor made tools with similar concept also available on demand for the application of Back Boring, OD Turning & Undercut machining.
- Pre-loaded (pre-tensioned) assembly of MBU guaranteeing almost zero backlash.
- Adjustment can be done directly while the tool is on the machine, thus reducing downtime or setting time.
- Available in a wide range of variants and inserts enabling high degree of flexibility & a variety of precision boring applications.
- Apart from the standard product range, tailor made fine boring bars are also manufactured on demand.
- Std. Range For ID Boring - BT40
- Std. Range For ID Boring - BT50
- Back Boring Tool
- ID Boring & Undercut Machining
- OD Turning & Undercut Machining
- Operating Instructions
- Precautionary Measures
Fine Boring Bar with MBU
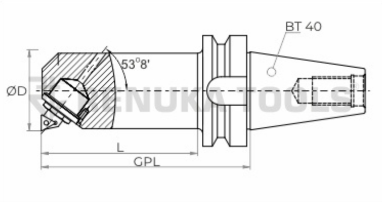
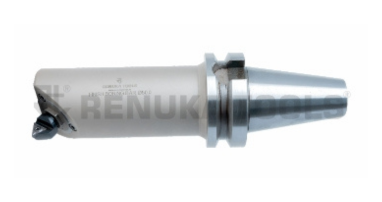
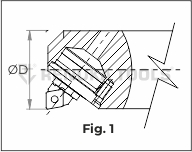
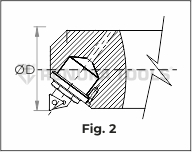
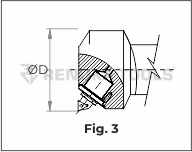
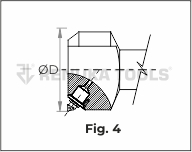
Specification Chart
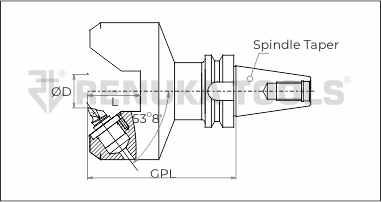
| Fig No. | Sr. No. | Item Code | Spindle Taper | MBU Item Code | D (Ømin - Ømax) | L | GPL |
|---|---|---|---|---|---|---|
| Fig No.1 | ||||||
| 1 | RTFBB 20-22 BT40 | BT40 | RTMBU ALC 04 | 20-22 | 60 | 92 |
| 2 | RTFBB 22-24 BT40 | BT40 | 22-24 | 60 | 92 | |
| 3 | RTFBB 24-26 BT40 | BT40 | 24-26 | 60 | 92 | |
| Fig No.2 | ||||||
| 4 | RTFBB 25.4-28 BT40 | BT40 | RTMBU ALT 06 / RTMBU ALC 06 | 25.4-28 | 80 | 112 |
| 5 | RTFBB 28-31 BT40 | BT40 | 28-31 | 80 | 112 | |
| 6 | RTFBB 31-34 BT40 | BT40 | 31-34 | 100 | 122 | |
| 7 | RTFBB 33.1-38 BT40 | BT40 | RTMBU ALT 09 / RTMBU ALTP 09 | 33.1-38 | 100 | 122 |
| 8 | RTFBB 38-43 BT40 | BT40 | 38-43 | 100 | 122 | |
| 9 | RTFBB 42.6-51 BT40 | BT40 | RTMBU ALT 11 / RTMBU ALTP 11 / RTMBU ALC 09 | 42.6-51 | 100 | 122 |
| 10 | RTFBB 51-59 BT40 | BT40 | 51-59 | 100 | 132 | |
| Fig No.3 | ||||||
| 11 | RTFBB 59-67 BT40 | BT40 | 59-67 | 100 | 132 | |
| 12 | RTFBB 67-75 BT40 | BT40 | 67-75 | 100 | 132 | |
| 13 | RTFBB 75-83 BT40 | BT40 | 75-83 | 100 | 132 | |
| 14 | RTFBB 83-91 BT40 | BT40 | 83-91 | 100 | 132 | |
| 15 | RTFBB 91-99 BT40 | BT40 | 91-99 | 100 | 132 | |
| 16 | RTFBB 99-107 BT40 | BT40 | 99-107 | 100 | 132 | |
| 17 | RTFBB 107-115 BT40 | BT40 | 107-115 | 100 | 132 | |
| Fig No.4 | ||||||
| 18 | RTFBB 115-124 BT40 | BT40 | 115-124 | 100 | 132 | |
| 19 | RTFBB 124-132 BT40 | BT40 | 124-132 | 100 | 132 | |
| Fig No.3 | ||||||
| 24 | RTFBB 60.6-72 BT40 | BT40 | RTMBU ALT 16 / RTMBU ALTP 16 | 60.6-72 | 100 | 132 |
| 25 | RTFBB 72-84 BT40 | BT40 | 72-84 | 100 | 132 | |
| 26 | RTFBB 84-96 BT40 | BT40 | 84-96 | 100 | 132 | |
| 27 | RTFBB 96-108 BT40 | BT40 | 96-108 | 100 | 132 | |
| 28 | RTFBB 108-120 BT40 | BT40 | 108-120 | 100 | 132 | |
| Fig No.4 | 29 | RTFBB 120-132 BT40 | BT40 | 120-132 | 100 | 132 |
Notes
- Fine Boring Tools do not include Micro Bore Units and inserts. Order for Micro Bore Units to be placed separately.
- Lead time of 1-2 weeks for all options.
- Customized fine boring bars for other spindle tapers / Side-Lock type can also be provided but will be made to order with lead time of 3-6 weeks.
- Customized fine boring bars for special diameter ranges can also be provided but will be made to order with lead time of 3-6 weeks.
- Diameter range "D" calculated considering 0.4mm insert nose radius.
- For additional cutting length requirement, customized fine boring bars with anti-vibration treatment can be tailor made with lead time of 3-6 weeks.
- Above standard variants are for Left hand cutting only and for ID boring application only. Other Fine Boring Tools for Right hand cutting & other applications such as OD Turning, Undercut Machining & Back Boring can be tailor made as per requirement. For all these applications, standard Micro Bore Units are available from Renuka Tools.
- Renuka Tools strongly recommend using these Fine Boring Tools for one particular diameter only. Too much of fiddling with adjustments, may result in permanent damage of the Micro Bore Unit and thus need to be used with precautions.
- Please refer to Renuka Tools' Micro Bore Unit's catalogue / webpage for details of Micro Bore Units used in above Fine Boring Tools. Click here for further details on Micro Bore Units.
- Maximum recommended material removal of 0.5mm diametrically.
Fine Boring Bar with MBU
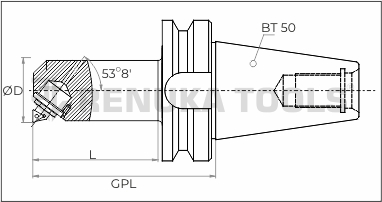
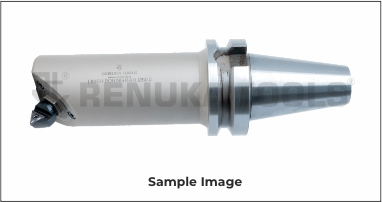


Specification Chart
| Fig No. | Sr. No. | Item Code | Spindle Taper | MBU Item Code | D (Ømin - Ømax) | L | GPL |
|---|---|---|---|---|---|---|
| Fig No.1 | ||||||
| 1 | RTFBB 20-22 BT50 | BT50 | RTMBU ALC 04 | 20-22 | 60 | 103 |
| 2 | RTFBB 22-24 BT50 | BT50 | 22-24 | 60 | 103 | |
| 3 | RTFBB 24-26 BT50 | BT50 | 24-26 | 60 | 103 | |
| Fig No.2 | ||||||
| 4 | RTFBB 25.4-28 BT50 | BT50 | RTMBU ALT 06 / RTMBU ALC 06 | 25.4-28 | 80 | 123 |
| 5 | RTFBB 28-31 BT50 | BT50 | 28-31 | 80 | 123 | |
| 6 | RTFBB 31-34 BT50 | BT50 | 31-34 | 90 | 133 | |
| 7 | RTFBB 33.1-38 BT50 | BT50 | RTMBU ALT 09 / RTMBU ALTP 09 | 33.1-38 | 90 | 133 |
| 8 | RTFBB 38-43 BT50 | BT50 | 38-43 | 90 | 133 | |
| 9 | RTFBB 42.6-51 BT50 | BT50 | RTMBU ALT 11 / RTMBU ALTP 11 / RTMBU ALC 09 | 42.6-51 | 90 | 133 |
| 10 | RTFBB 51-59 BT50 | BT50 | 51-59 | 100 | 143 | |
| Fig No.3 | ||||||
| 11 | RTFBB 59-67 BT50 | BT50 | 59-67 | 100 | 143 | |
| 12 | RTFBB 67-75 BT50 | BT50 | 67-75 | 100 | 143 | |
| 13 | RTFBB 75-83 BT50 | BT50 | 75-83 | 100 | 143 | |
| 14 | RTFBB 83-91 BT50 | BT50 | 83-91 | 100 | 143 | |
| 15 | RTFBB 91-99 BT50 | BT50 | 91-99 | 100 | 143 | |
| 16 | RTFBB 99-107 BT50 | BT50 | 99-107 | 100 | 143 | |
| 17 | RTFBB 107-115 BT50 | BT50 | 107-115 | 100 | 143 | |
| Fig No.4 | ||||||
| 18 | RTFBB 115-124 BT50 | BT50 | 115-124 | 100 | 143 | |
| 19 | RTFBB 124-132 BT50 | BT50 | 124-132 | 100 | 143 | |
| 20 | RTFBB 132-140 BT50 | BT50 | 132-140 | 100 | 143 | |
| 21 | RTFBB 140-148 BT50 | BT50 | 140-148 | 100 | 143 | |
| 22 | RTFBB 148-156 BT50 | BT50 | 148-156 | 100 | 143 | |
| 23 | RTFBB 156-164 BT50 | BT50 | 156-164 | 100 | 143 | |
| Fig No.3 | ||||||
| 24 | RTFBB 60.6-72 BT50 | BT50 | RTMBU ALT 16 / RTMBU ALTP 16 | 60.6-72 | 100 | 143 |
| 25 | RTFBB 72-84 BT50 | BT50 | 72-84 | 100 | 143 | |
| 26 | RTFBB 84-96 BT50 | BT50 | 84-96 | 100 | 143 | |
| 27 | RTFBB 96-108 BT50 | BT50 | 96-108 | 100 | 143 | |
| 28 | RTFBB 108-120 BT50 | BT50 | 108-120 | 100 | 143 | |
| Fig No.4 | ||||||
| 29 | RTFBB 120-132 BT50 | BT50 | 120-132 | 100 | 143 | |
| 30 | RTFBB 132-144 BT50 | BT50 | 132-144 | 100 | 143 | |
| 31 | RTFBB 144-156 BT50 | BT50 | 144-156 | 100 | 143 | |
| 32 | RTFBB 156-168 BT50 | BT50 | 156-168 | 100 | 143 |
Notes
- Fine Boring Tools do not include Micro Bore Units and inserts. Order for Micro Bore Units to be placed separately.
- Lead time of 1-2 weeks for all options.
- Customized fine boring bars for other spindle tapers / Side-Lock type can also be provided but will be made to order with lead time of 3-6 weeks.
- Customized fine boring bars for special diameter ranges can also be provided but will be made to order with lead time of 3-6 weeks.
- Diameter range "D" calculated considering 0.4mm insert nose radius.
- For additional cutting length requirement, customized fine boring bars with anti-vibration treatment can be tailor made with lead time of 3-6 weeks.
- Above standard variants are for Left hand cutting only and for ID boring application only. Other Fine Boring Tools for Right hand cutting & other applications such as OD Turning, Undercut Machining & Back Boring can be tailor made as per requirement. For all these applications, standard Micro Bore Units are available from Renuka Tools.
- Renuka Tools strongly recommend using these Fine Boring Tools for one particular diameter only. Too much of fiddling with adjustments, may result in permanent damage of the Micro Bore Unit and thus need to be used with precautions.
- Please refer to Renuka Tools' Micro Bore Unit's catalogue / webpage for details of Micro Bore Units used in above Fine Boring Tools. Click here for further details on Micro Bore Units.
- Maximum recommended material removal of 0.5mm diametrically.
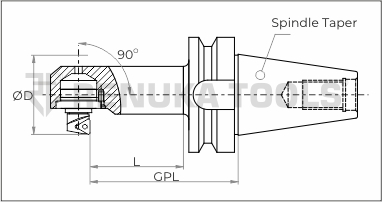
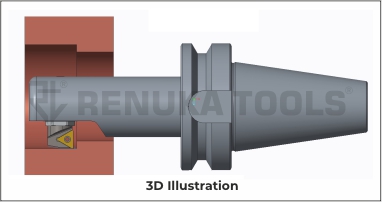
Back Boring Tool
Notes
- Minimum Diameter ØD = Ø22.0mm
- Fine Boring Tools for Back Boring application will be tailor made as per requirements.
- For Back Boring applications, standard Micro Bore Units are available from Renuka Tools. Click here to know more
- Lead time of 2-3 weeks.
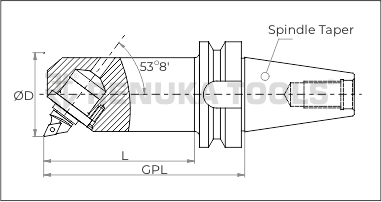
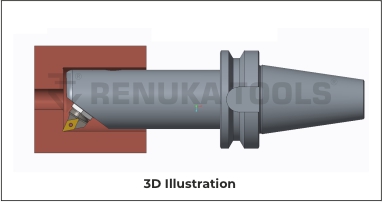
ID Boring & Undercut Machining
Notes
- Minimum Diameter ØD = Ø37.1mm
- Fine Boring Tools for ID Boring & Undercut Machining application will be tailor made as per requirements.
- For ID Boring & Undercut Machining applications, standard Micro Bore Units are available from Renuka Tools. Click here to know more.
- Lead time of 2-3 weeks.
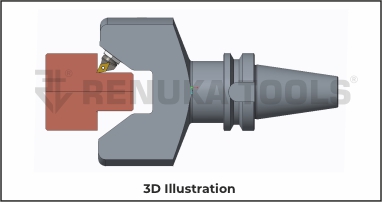
OD Turning & Undercut Machining
Notes
- Minimum Diameter ØD = Ø12.0mm
- Fine Boring Tools for OD Turning & Undercut Machining application will be tailor made as per requirements.
- For OD Turning & Undercut Machining applications, standard Micro Bore Units are available from Renuka Tools.Click here to know more
- Lead time of 2-3 weeks.
Operating Instructions
Notes
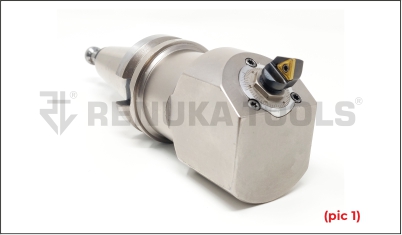
- Mount the Fine Boring Unit properly in the finish boring tool supplied by Renuka Tools. This can be easily done by simply tightening the mounting screws in a proper manner (Pic.1). In case the tool is of any other brand ensure that the manufacturer adheres to the mounting instructions provided by Renuka Tools. Else, it might result in non-efficient working or even tool failure.
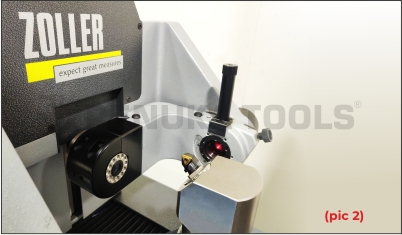
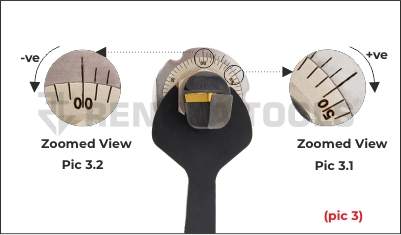
- Set the required diameter before clamping the tool on the machine, ideally on a tool pre-setter, or else with the help of a precise dial indicator (Pic.2). During this setting, ensure that any one scale marking on the FBU inner scale coincides exactly with the extreme end marking on the outer vernier scale. This will automatically match some other inner scale marking with the other extreme end of the outer vernier scale (Pic.3). This will help the user to quickly adjust after initial trial of tool.
- See if the desired results are obtained by running the tool on the machine. In case of any deviation in the desired results, kindly use the spanner for adjustment. For increasing the diameter, rotate in clockwise direction and for decreasing, rotate in counter-clockwise direction. One entire division movement of the inner FBU scale will give you 20 microns on diameter (i.e., 10 microns radially). Now use the vernier scale for adjustment. If the diameter reading has to be increased, kindly match the adjacent marking (of left side) with the nearest vernier scale marking. This will result in increase of 2 microns on the diameter (i.e., 1 micron radially) (Pic 3.1 - Zoomed). For reduction of diameter, follow the same procedure in the opposite direction (Pic 3.2 - Zoomed).
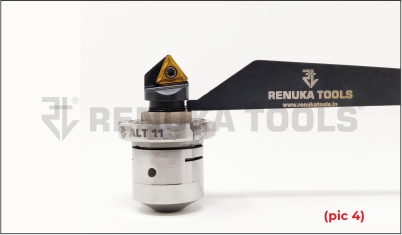
- Maximum diameter adjustment can be checked from the rear end of the spanner (Pic.4). Do not exceed the maximum limit as it may cause permanent damage to the unit.
Precautionary Measures
- Due to constraints in the assembly tolerances, it is recommended that units, if damaged, are returned to Renuka Tools for assessment/repair in a controlled environment. Commercials for repair can only be determined after detailed assessment of the damaged unit.
- Renuka Tools Micro Bore Unit cannot be adjusted beyond its range and the maximum range can be checked from the thickness of the end portion of the spanner provided along with the unit. Exceeding the range might result in permanent damage to the unit.
- Kindly change the mounting screws and insert screws ahead in time to avoid accidents.
- In case of any observed decrease in accuracy over the time of usage, kindly request Renuka Tools for servicing the unit.
